|
Time -
Place your mouse pointer directly over the time but do not click.
Windows will display the date. |
 |
| Time Icon |
|
With your mouse pointer directly over
the time gently click two quick times to open the Date/Time control panel Notification Area Sometimes referred to
as the system tray, Systray, shell
notification area, and the taskbar status area. The notification
area is a portion of Microsoft Windows that was first introduced
with Windows 95 and found with all later versions of Windows that display
programs running in the background |
 |
| Notification Area |
|
The notification area
is located on the right portion of the Taskbar next to the time. The image shows two
examples of what the Windows notification area look like. The left image
shows the layout of all versions prior to Windows 7; the introduction of Windows
7 gave a new look to the Systray, hiding all the icons until the user clicks
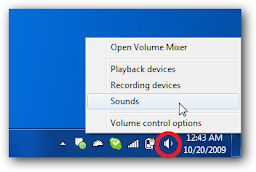
the small "up arrow." Sound Control - The yellow speaker
is the Sound icon. Notice that mine has a red circle over it
with a diagonal slash. That is the universal symbol for No. |
|
|
|
|
|
A very interesting choice is there, second from the bottom. You can Minimize All Windows with one click. When you are ready to bring them all back, repeat the process and this time the menu will allow you to Undo Minimize All.
The Start Menu The image below is what you would see if you put your mouse pointer over the Start button and gently click one time with the left mouse button. This image is clickable. |
 |
| Start Menu |
|
Put the tip of your mouse pointer on an
item and gently click one time with the left mouse button Caution: Not all of the items
in the window are clickable |
|
Programs
The common way to get to any program or application stored on your
computer is to slide your mouse pointer up to the programs menu, then select
an application which you want to work in.
This is also where you will go to get to the built-in items that you
learned about earlier. You are not required to click on this area of the menu,
but you may. Whether you click or not, move your mouse pointer quickly to the
right into the list of applications.
|
|
|
|
Find "I saved it! I know I did!" I know you have either said
that, or heard someone else say that. Whenever you save a document, the Find window indicates the location
that the document was saved to. New computer users don't always notice where their masterpiece was saved. That is what this menu choice is for. Think about that for a minute. Yes, that's right! Everyone has trouble, at one time or another, remembering exactly where a document was saved.
|
|
Steps
for using the Find menu choice:
|
| Find menu |
|
Help
Help - No, you are not the only one that needs Help from
time to time. The people that wrote Windows knew that and have provided a
very large index of topics.
The first few times you use Windows Help you will probably want
to use the Contents tab as you see in the window below. If you have an
idea as to what you are looking for, use the Index tab |
| Help Menu |
Shut Down
Shut Down - If your computer is not frozen you should shut your computer down using the Shut Down menu. Do not automatically press the Enter key when you see the Shut Down Windows dialog box pop-up.
|
|
|
|
Windows remembers the last thing that you did with this dialog box. If the last thing you did was Restart and you press the Enter key you will Restart not Shut down.
Develop a habit of carefully reading the dialog boxes that pop up.
Start Button
Start Button - This is the button you use to access all of the choices described above.
Inactive Window - Make an Inactive window Active by clicking on the button in the Task bar
 |
| Inactive Window |
Desktop Items
The visible image that covers your entire screen is known as your Desktop.
On your desktop are several small images called icons. You may also have icons that appear to be file folders. Each time you save something to the Desktop, an icon is added there. Some of the icons are known as Shortcuts.
Those are small instructions which tell your computer where a larger program is located. To find out about each of the elements
displayed below, click on the item.
|
My Documents My Documents - Unless you instruct Window otherwise, the
standard (default) place where your documents are saved is in My Documents.
As you create more documents (known as files) on your computer you may
wish to save them in other places. As you are getting accustomed to using your computer My Documents
is a good place to save things.
|
|
My Computer My Computer - This
icon displays the
For Example: put the
tip of your mouse pointer on the Local disc (D:) icon and gently click two
quick times on the icon to see what is in your CD Drive. |
|
Internet Explorer - Double clicking on this
icon will launch the Internet browser named Internet Explorer. Internet
Explorer |
| Internet Explorer |
|
Recycle
Bin
Recycle Bin - Speaking of throwing things away, this is the place there they go when you delete them from anywhere accept a floppy disk and Flash disc. Items deleted from a floppy disk and Flash disc are immediately discarded from your computer. Anything else you delete goes to the Recycle Bin.
Items in the Recycle Bin may be removed from the bin, or the Recycle
Bin may be emptied. To empty the bin, place the tip of your mouse pointer
on the bin icon and gently click one time with the right mouse button. When
the popup menu appears, slide down to Empty Recycle Bin and gently
click one time with the left mouse button.
When Recycle Bin has been emptied, those items are gone from
your computer (unless someone like the FBI is looking at your hard drive -
Yeah, it left traces of itself which can be discovered by someone who really
knows how to look.
|
|
|
CREATING\REMOVING(DELETING) A SHORTCUT TO A PROGRAM OR FILE
|
|
|
|
To
create a shortcut: On the desktop to a program or file, there are two possible methods to
choose from. Method 1 1) Right-click an open area on the desktop, point to New, and then
click Shortcut. 2) Click Browse. 3) Locate the program or file to which you want to create a shortcut,
click the program or file, click Open, and then click Next. 4) Type a name for the shortcut. If a Finish button appears at the
bottom of the dialog box, click it. If a Next button appears at the
bottom of the dialog box, click it, click the icon you want to use for the
shortcut, and then click Finish. |
|
Method 2 1) Click Start, point to Programs, and then right-click the
program you want to create the shortcut to. 2) Click Create Shortcut. 3) The shortcut is now at the end of the Programs list. For example, if
you created a shortcut to Microsoft Word, to find that program, click Start,
and then point to Programs. You will find the shortcut, named
"Microsoft Word (2)" (without the quotation marks), at the bottom
of the Program list. 4) Drag the shortcut to the Desktop. |
|
To Delete a Desktop
Shortcut:
Method 1 1) This first method to delete a desktop shortcut is quite simple: 2) Move your mouse over the desktop shortcut you wish to delete and press
the left mouse button. 3) The icon will become selected and highlighted. 4) With the icon still selected and the left mouse button still down, drag
the desktop shortcut over to and on top of the Recycle Bin icon on the
desktop. 5) Release the left mouse button. 6) If it is a program shortcut you are deleting, Windows will show a
message (as explained above) and ask for confirmation. 7) No message appears if the desktop shortcut is for a file or folder.
|
Method 2
1) Left click the desktop shortcut to select it.
2) Right click the desktop shortcut.
3) A menu appears.
4) Left click the Delete item on the menu that appeared.
5) Windows will ask you to confirm deleting the shortcut.
6) Just like our first method, you will get a message from Windows about
deleting the shortcut if it is for a program. See the beginning of this article
if you missed what the message says.
7) For a file or folder shortcut, you will see a message from Windows
asking for confirmation.
|


No comments:
Post a Comment